
Your jazzy presentation is ready; you are all set to send your 25-page proposal; your three-year financial plan sheets are up for review. Before you share or send such content, pause for a moment to check if the content is truly accessible for all the recipients – which includes persons with disabilities.
Making your content accessible doesn’t require additional resources nor it consumes more time. As we commemorate the International Day for Persons with Disabilities, here are a few tips to help you make your content accessible within minutes. With these simple steps, you could be doing your bit to ensure inclusion by design in an increasing digital world as well as being compliant with global standards.
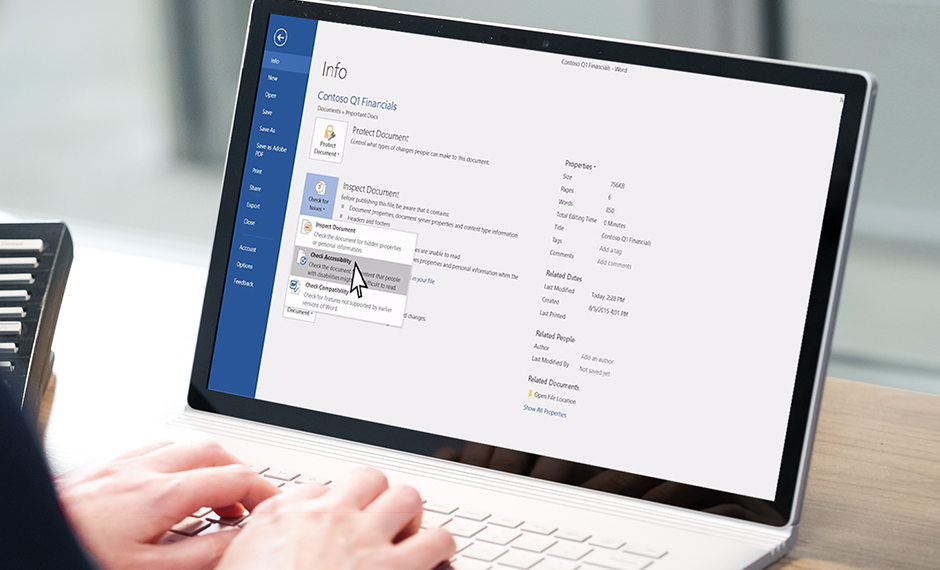
1. Use the Accessibility Checker
Office 365 apps like Word, PowerPoint, Excel, Outlook, OneNote and Visio have an Accessibility Checker feature. On the toolbar ribbon, go to the ‘Review’ tab and select ‘Check Accessibility’. In older versions of Office (Office 2010 or 2013), go to File > Info > Check for Issues > Check Accessibility.
If your file is not accessible, you will get a list of errors, warnings, and tips, with suggestions on how to modify the content. Errors refer to content that makes it nearly impossible or difficult for people with disabilities to understand, while warnings refer to sections within the content that may be difficult to understand. For content that is understandable but can be made better, you will get tips.
The Accessibility Checker looks at factors such as insufficient color contrast for people with low vision, larger fonts for neurodiversity and so on. More importantly, it reviews for presence of Alt Text as explained below.
Find out more about the rules of accessibility checker.
2. Add Alt Text
Assistive technologies such as screen readers, for example Narrator or JAWS, help people with disabilities understand content. Alternative Text (Alt Text) ensures that all visuals such as objects, graphs or images within a content piece have an alternative text description, which isn’t the image name or file extensions.
This alternative text is used by screen readers to describe the meaning and context of the visual item. While adding Alt Text, ensure that the description is clear and unambiguous. The context of the image, whether an emotion, location or color needs to be clearly described. For example: instead of the Alt Text being “A photo of two men”, a contextual description would be “Two men in a coffee shop. One man, wearing a suit and tie, is having a conversation with another man.”
Learn more about how to write effective Alt Text.
3. Format your content correctly
Formatting your content in the right manner ensures that screen readers do not have any problem navigating through it. Here are some formatting guidelines:
a. Ensure all tables have a header row
This is used to indicate the content within that column. In addition, a simple table structure without nested, split or merged cells helps users navigate using keyboard shortcuts or assistive technology.
b. Have titles for all slides
This helps users with disabilities to navigate the presentation and find the appropriate slide easily, when referencing.
c. Don’t use color as a method to indicate negative
Often in Excel, a red color indicatives negative value, and the negative (-) sign is missing. This is problematic for those with color blindness.
d. Have a high contrast
The contrast of text and background should be high so that people with low vision can easily read the text.
e. Add screen tips with hyperlinks
Ensure that your hyperlinks have clear information about the destination. Instead of ‘Click here’ as a hyperlink, it should be details of the destination page. You can also add Screen tips to the hyperlink for additional information.
4. Add closed captions in videos
If you have video or audio files, you can add closed captions. Closed captions describe audio cues such as music or sound effects. This makes the video or audio accessible to those with hearing disabilities or even those who don’t understand the language in the multimedia file.
Adding a closed caption is quite easy. Create a new file in Notepad and name it with a .VTT extension. Start with typing WebVTT, and then in the next line add the start and end time where you want the closed caption. Add the caption, press enter twice and then add the next start and end time. Repeat till you have all the captions.
You can find out more details on creating Closed Captions for videos here.
5. PowerPoint Translator
Accessibility is also about ensuring people are able to follow you even if they don’t speak the same language. You can use Presentation Translator add-in to add subtitles in over 60 languages to your presentation as you are delivering it. Audiences can see the subtitles in their language in real-time using their device. The Microsoft Translator add-in also allows you to translate the text in PowerPoint slides in more than 60 languages. Download the Presentation Translator Add-in.
Additional reading:
Make your Word document accessible to people with disabilities
Make your Excel documents accessible to people with disabilities
Make your PowerPoint presentations accessible to people with disabilities
Make your Outlook email accessible to people with disabilities


